21 RDD: More on GITing Started with Github
One of the goals for this course is to familiarize yourself with Git and GitHub. This section is a fusion of GitHub Classroom’s github-starter-course and Jenny Bryan’s happygitwithr. I strongly encourage you to check out the unabridged version of happygit as it has so much more detail. Alternatively, if you’d rather not read, this video by Jess Chan of Coder Coder is extremely helpful in getting you started.
I just got a recruiter message as a comment on a Github commit... now that's a first. pic.twitter.com/ON9yBzs9xt
— Dylan Garcia (@_dylanga) February 11, 2022
21.1 The Basics of GitHub and Git
21.1.1 What is Git?
Git is a distributed Version Control System (VCS), which means it is a useful tool for easily tracking changes to your code, collaborating, and sharing. With Git you can track the changes you make to your project so you always have a record of what you’ve worked on and can easily revert back to an older version if need be. It also makes working with others easier—groups of people can work together on the same project and merge their changes into one final source!
21.1.2 What is GitHub?
GitHub extends Git’s capabilities by providing a web-based interface for collaboration. It’s widely used for code development, allowing multiple people to work together on projects. GitHub hosts your repositories (project folders) and provides tools for managing changes, reviewing code, and collaborating with others.
21.2 Understanding the GitHub flow
The GitHub flow is a lightweight workflow that allows you to experiment and collaborate on your projects easily, without the risk of losing your previous work.
21.2.1 Key Terms
Repository: Your project’s digital directory on GitHub.
Clone: Copying a repository to your computer.
Commit: Recording changes to your files in the repository.
Push: Uploading local repository changes to GitHub.
21.2.1.1 Repositories
A repository is where your project work happens–think of it as your project folder. It contains all of your project’s files and revision history. You can work within a repository alone or invite others to collaborate with you on those files.
21.2.1.2 Cloning
When a repository is created with GitHub, it’s stored remotely in the ☁️. You can clone a repository to create a local copy on your computer and then use Git to sync the two. This makes it easier to fix issues, add or remove files, and push larger commits. You can also use the editing tool of your choice as opposed to the GitHub UI. Cloning a repository also pulls down all the repository data that GitHub has at that point in time, including all versions of every file and folder for the project! This can be helpful if you experiment with your project and then realize you liked a previous version more. To learn more about cloning, read “Cloning a Repository”.
21.2.1.3 Committing and pushing
Committing and pushing are how you can add the changes you made on your local machine to the remote repository in GitHub. That way your instructor or teammates can see your latest work when you’re ready to share it. You can make a commit when you have made changes to your project that you want to “checkpoint.” You can also add a helpful commit message to remind yourself or your teammates what work you did (e.g. “Added a README with information about our project”).
Once you have a commit or multiple commits that you’re ready to add to your repository, you can use the push command to add those changes to your remote repository. Committing and pushing may feel new at first, but we promise you’ll get used to it 🙂
21.3 💻 GitHub terms to know
21.3.1 Repositories
We mentioned repositories already, they are where your project work happens, but let’s talk a bit more about the details of them! As you work more on GitHub you will have many repositories which may feel confusing at first. Fortunately, your “GitHub dashboard” helps to easily navigate to your repositories and see useful information about them. Make sure you’re logged in to see it!
Repositories also contain READMEs. You can add a README file to your repository to tell other people why your project is useful, what they can do with your project, and how they can use it. We are using this README to communicate how to learn Git and GitHub with you. 😄
To learn more about repositories read “Creating, Cloning, and Archiving Repositories and “About README’s”.
21.3.2 Branches
You can use branches on GitHub to isolate work that you do not want merged into your final project just yet. Branches allow you to develop features, fix bugs, or safely experiment with new ideas in a contained area of your repository. Typically, you might create a new branch from the default branch of your repository—main. This makes a new working copy of your repository for you to experiment with. Once your new changes have been reviewed by a teammate, or you are satisfied with them, you can merge your changes into the default branch of your repository.
To learn more about branching, read “About Branches”.
21.3.3 Forks
A fork is another way to copy a repository, but is usually used when you want to contribute to someone else’s project. Forking a repository allows you to freely experiment with changes without affecting the original project and is very popular when contributing to open source software projects!
To learn more about forking, read “Fork a repo”
21.3.4 Pull requests
When working with branches, you can use a pull request to tell others about the changes you want to make and ask for their feedback. Once a pull request is opened, you can discuss and review the potential changes with collaborators and add more changes if need be. You can add specific people as reviewers of your pull request which shows you want their feedback on your changes! Once a pull request is ready-to-go, it can be merged into your main branch.
To learn more about pull requests, read “About Pull Requests”.
21.3.5 Issues
Issues are a way to track enhancements, tasks, or bugs for your work on GitHub. Issues are a great way to keep track of all the tasks you want to work on for your project and let others know what you plan to work on. You can also use issues to tell a favorite open source project about a bug you found or a feature you think would be great to add!
For larger projects, you can keep track of many issues on a project board. GitHub Projects help you organize and prioritize your work and you can read more about them in this “About Project boards document. You likely won’t need a project board for your assignments, but once you move on to even bigger projects, they’re a great way to organize your team’s work! You can also link together pull requests and issues to show that a fix is in progress and to automatically close the issue when someone merges the pull request.
To learn more about issues and linking them to your pull requests, read “About Issues”.
21.3.6 Your user profile
Your profile page tells people the story of your work through the repositories you’re interested in, the contributions you’ve made, and the conversations you’ve had. You can also give the world a unique view into who you are with your profile README. You can use your profile to let future employers know all about you!
To learn more about your user profile and adding and updating your profile README, read “Managing Your Profile README”.
21.3.7 Using markdown on GitHub
You might have noticed already, but you can add some fun styling to your issues, pull requests, and files. “Markdown” is an easy way to style your issues, pull requests, and files with some simple syntax. This can be helpful to organize your information and make it easier for others to read. You can also drop in gifs and images to help convey your point!
To learn more about using GitHub’s flavor of markdown, read “Basic Writing and Formatting Syntax”.
21.3.8 Engaging with the GitHub community
The GitHub community is vast. There are many types of people who use GitHub in their day to day—students like you, professional developers, hobbyists working on open source projects, and explorers who are just jumping into the world of software development on their own. There are many ways you can interact with the larger GitHub community, but here are three places where you can start.
21.3.8.1 Starring repositories
If you find a repository interesting or you want to keep track of it, star it! When you star a repository it’s also used as a signal to surface better recommendations on github.com/explore. If you’d like to get back to your starred repositories you can do so via your user profile.
To learn more about starring repositories, read “Saving Repositories with Stars”.
21.3.8.2 Following users
You can follow people on GitHub to receive notifications about their activity and discover projects in their communities. When you follow a user, their public GitHub activity will show up on your dashboard so you can see all the cool things they are working on.
To learn more about following users, read “Following People”.
21.3.8.3 Browsing GitHub Explore
GitHub Explore is a great place to do just that … explore :smile: You can find new projects, events, and developers to interact with. You can check out the GitHub Explore website at github.com/explore. The more you interact with GitHub the more tailored your Explore view will be.
21.4 Half the battle
Getting all the necessary software installed, configured, and playing nicely together is honestly half the battle when first adopting Git. Brace yourself for some pain. The upside is that you can give yourself a pat on the back once you get through this. And you WILL get through this.
You will find far more resources for how to use Git than for installation and configuration. Why? The experts …
- Have been doing this for years. It’s simply not hard for them anymore.
- Probably use some flavor of Unix. They may secretly (or not so secretly) take pride in neither using nor knowing Windows.
- Get more satisfaction and reward for thinking and writing about Git concepts and workflows than Git installation.
In their defense, it’s hard to write installation instructions. Failures can be specific to an individual OS or even individual computer.
21.4.1 Free private repos
GitHub offers free unlimited private repositories for all users. These free private repositories support up to three external collaborators, making them a perfect place for your personal projects, for job applications, and testing things out before making your project open source.
Go ahead and register your free account NOW and then pursue any special offer that applies to you:
Students, faculty, and educational/research staff: GitHub Education.
GitHub “Organizations” can be extremely useful for courses or research/lab groups,
- where you need some coordination across a set of repos and users.
Official nonprofit organizations and charities: GitHub for Good
21.5 Install Git
You need Git, so you can use it at the command line and so RStudio can call it. If there’s any chance it’s installed already, verify that, rejoice, and skip this step. Otherwise, find installation instructions below for your operating system.
- Install Git: Essential for interacting with GitHub. Installation instructions are available for Windows, macOS, and Linux/Unix.
21.5.1 Git already installed?
Go to the shell (More info on shell from Jenny Bryan). Enter which git to request the path to your Git executable:
and git --version to see its version:
If you are successful, that’s great! You have Git already. No need to install! Move on.
If, instead, you see something more like git: command not found, keep reading.
macOS users might get an immediate offer to install command line developer tools. Yes, you should accept! Click “Install” and read more below.
21.6 Windows
Option 1 (highly recommended): Install Git for Windows, also known as msysgit or “Git Bash”, to get Git in addition to some other useful tools, such as the Bash shell. Yes, all those names are totally confusing, but you might encounter them elsewhere and I want you to be well-informed.
We like this because Git for Windows leaves the Git executable in a conventional location, which will help you and other programs, e.g. RStudio, find it and use it. This also supports a transition to more expert use, because the “Git Bash” shell will be useful as you venture outside of R/RStudio.
- NOTE: When asked about “Adjusting your PATH environment”, make sure to select “Git from the command line and also from 3rd-party software”. Otherwise, we believe it is good to accept the defaults.
- Note that RStudio for Windows prefers for Git to be installed below
C:/Program Filesand this appears to be the default. This implies, for example, that the Git executable on my Windows system is found atC:/Program Files/Git/bin/git.exe. Unless you have specific reasons to otherwise, follow this convention.
This also leaves you with a Git client, though not a very good one. So check out Git clients the Jenny recommends
FYI, this appears to be equivalent to what you would download from here: https://git-scm.com/download/.
Additional approaches for Windows can be found here
21.6.1 macOS
Although I (Mason) have limited knowledge about the inner workings of mac, I do know of quantitative psychologists who use macs with R, including Bill Revelle – author of the psych package and Full Professor at Northwestern.
Option 1 (highly recommended): Install the Xcode command line tools (not all of Xcode), which includes Git.
Go to the shell and enter one of these commands to elicit an offer to install developer command line tools:
Accept the offer! Click on “Install”.
Here’s another way to request this installation, more directly:
We just happen to find this Git-based trigger apropos.
Note also that, after upgrading macOS, you might need to re-do the above and/or re-agree to the Xcode license agreement. We have seen this cause the RStudio Git pane to disappear on a system where it was previously working. Use commands like those above to tickle Xcode into prompting you for what it needs, then restart RStudio.
Option 2 (recommended): Install Git from here: http://git-scm.com/downloads.
This option arguably sets you up the best for the future. It will certainly get you the latest version of Git of all approaches described here.
The GitHub home for the macOS installer is here: https://github.com/timcharper/git_osx_installer.
- At that link, you can find more info if something goes wrong or you are working on an old version of macOS.
Additional approaches for macOS can be found here
21.7 Introduce yourself to Git
In the shell (More info on shell from Jenny Bryan):
git config --global user.name 'Jane Doe'
git config --global user.email 'jane@example.com'
git config --global --list
substituting your name and the email associated with your GitHub account.
The usethis package offers an alternative approach. You can set your Git user name and email from within R:
## install if needed (do this exactly once):
## install.packages("usethis")
library(usethis)
use_git_config(
  user.name = "Jane Doe",
  user.email = "jane@example.org"
)
21.7.1 More about git config
An easy way to get into a shell from RStudio is Tools > Terminal or Tools > Shell. (More info on shell from Jenny Bryan).
Special Windows gotchas: If you are struggling on Windows, consider there are different types of shell and you might be in the wrong one. You want to be in a “Git Bash” shell, as opposed to Power Shell or the legacy cmd.exe command prompt. This might also be a reason to do this configuration via the usethis package in R.
What user name should you give to Git? This name does not have to be your GitHub user name, although it can be. Another good option is your actual first name and last name. If you commit from different machines, sometimes people work that info into the user name. Your commits will be labeled with this user name, so make it informative to potential collaborators and future you.
What email should you give to Git? This email must be the email associated with your GitHub account.
These commands return nothing. You can check that Git understood what you typed by looking at the output of git config --global --list.
21.7.2 Configure the Git editor
Another Git option that many people eventually configure is the editor. At some point, you will fail to give Git what it wants in terms of a commit message and it will kick you into an editor. This can be distressing, if it’s not your editor of choice and you don’t even know how to save and quit. You can enforce your will with something along these lines:
Substitute your preferred editor for "emacs" here. Software Carpentry’s Git lesson has a comprehensive listing of the exact git config command needed for many combinations of OS and editor.
21.8 Install a Git client
Although having a git client is optional, I highly recommend it for the same reasons as I recommend having Rstudio.
Learning to use version control can be rough at first. I found the use of a GUI – as opposed to the command line – extremely helpful when I was getting started. I call this sort of helper application a Git client. It’s really a Git(Hub) client because it also helps you interact with GitHub or other remotes.
21.8.1 What is a Git client? Why would you want one?
“Git” is really just a collection of individual commands you execute in the shell. This interface is not appealing for everyone. Some may prefer to do Git operations via a client with a graphical interface.
Git and your Git client are not the same thing, just like R and RStudio are not the same thing. A Git client and an integrated development environment, such as RStudio, are not necessary to use Git or R, respectively. But they make the experience more pleasant because they reduce the amount of command line bullshittery and provide a richer visual representation of the current state.
RStudio offers a very basic Git client via its Git pane. I use this often for simple operations, but you probably want another, more powerful one as well.
Fair warning: for some tasks, you must use the command line. But the more powerful your Git client is, the less often this happens. The visual overview given by your Git client can also be invaluable for understanding the current state of things, even when preparing calls to command line Git.
Fantastic news: because all of the clients are just forming and executing Git commands on your behalf, you don’t have to pick one. You can literally do one operation from the command line, do another from RStudio, and another from SourceTree, one after the other, and it just works. Very rarely, both clients will scan the repo at the same time and you’ll get an error message about .git/index.lock. Try the operation again at least once before doing any further troubleshooting.
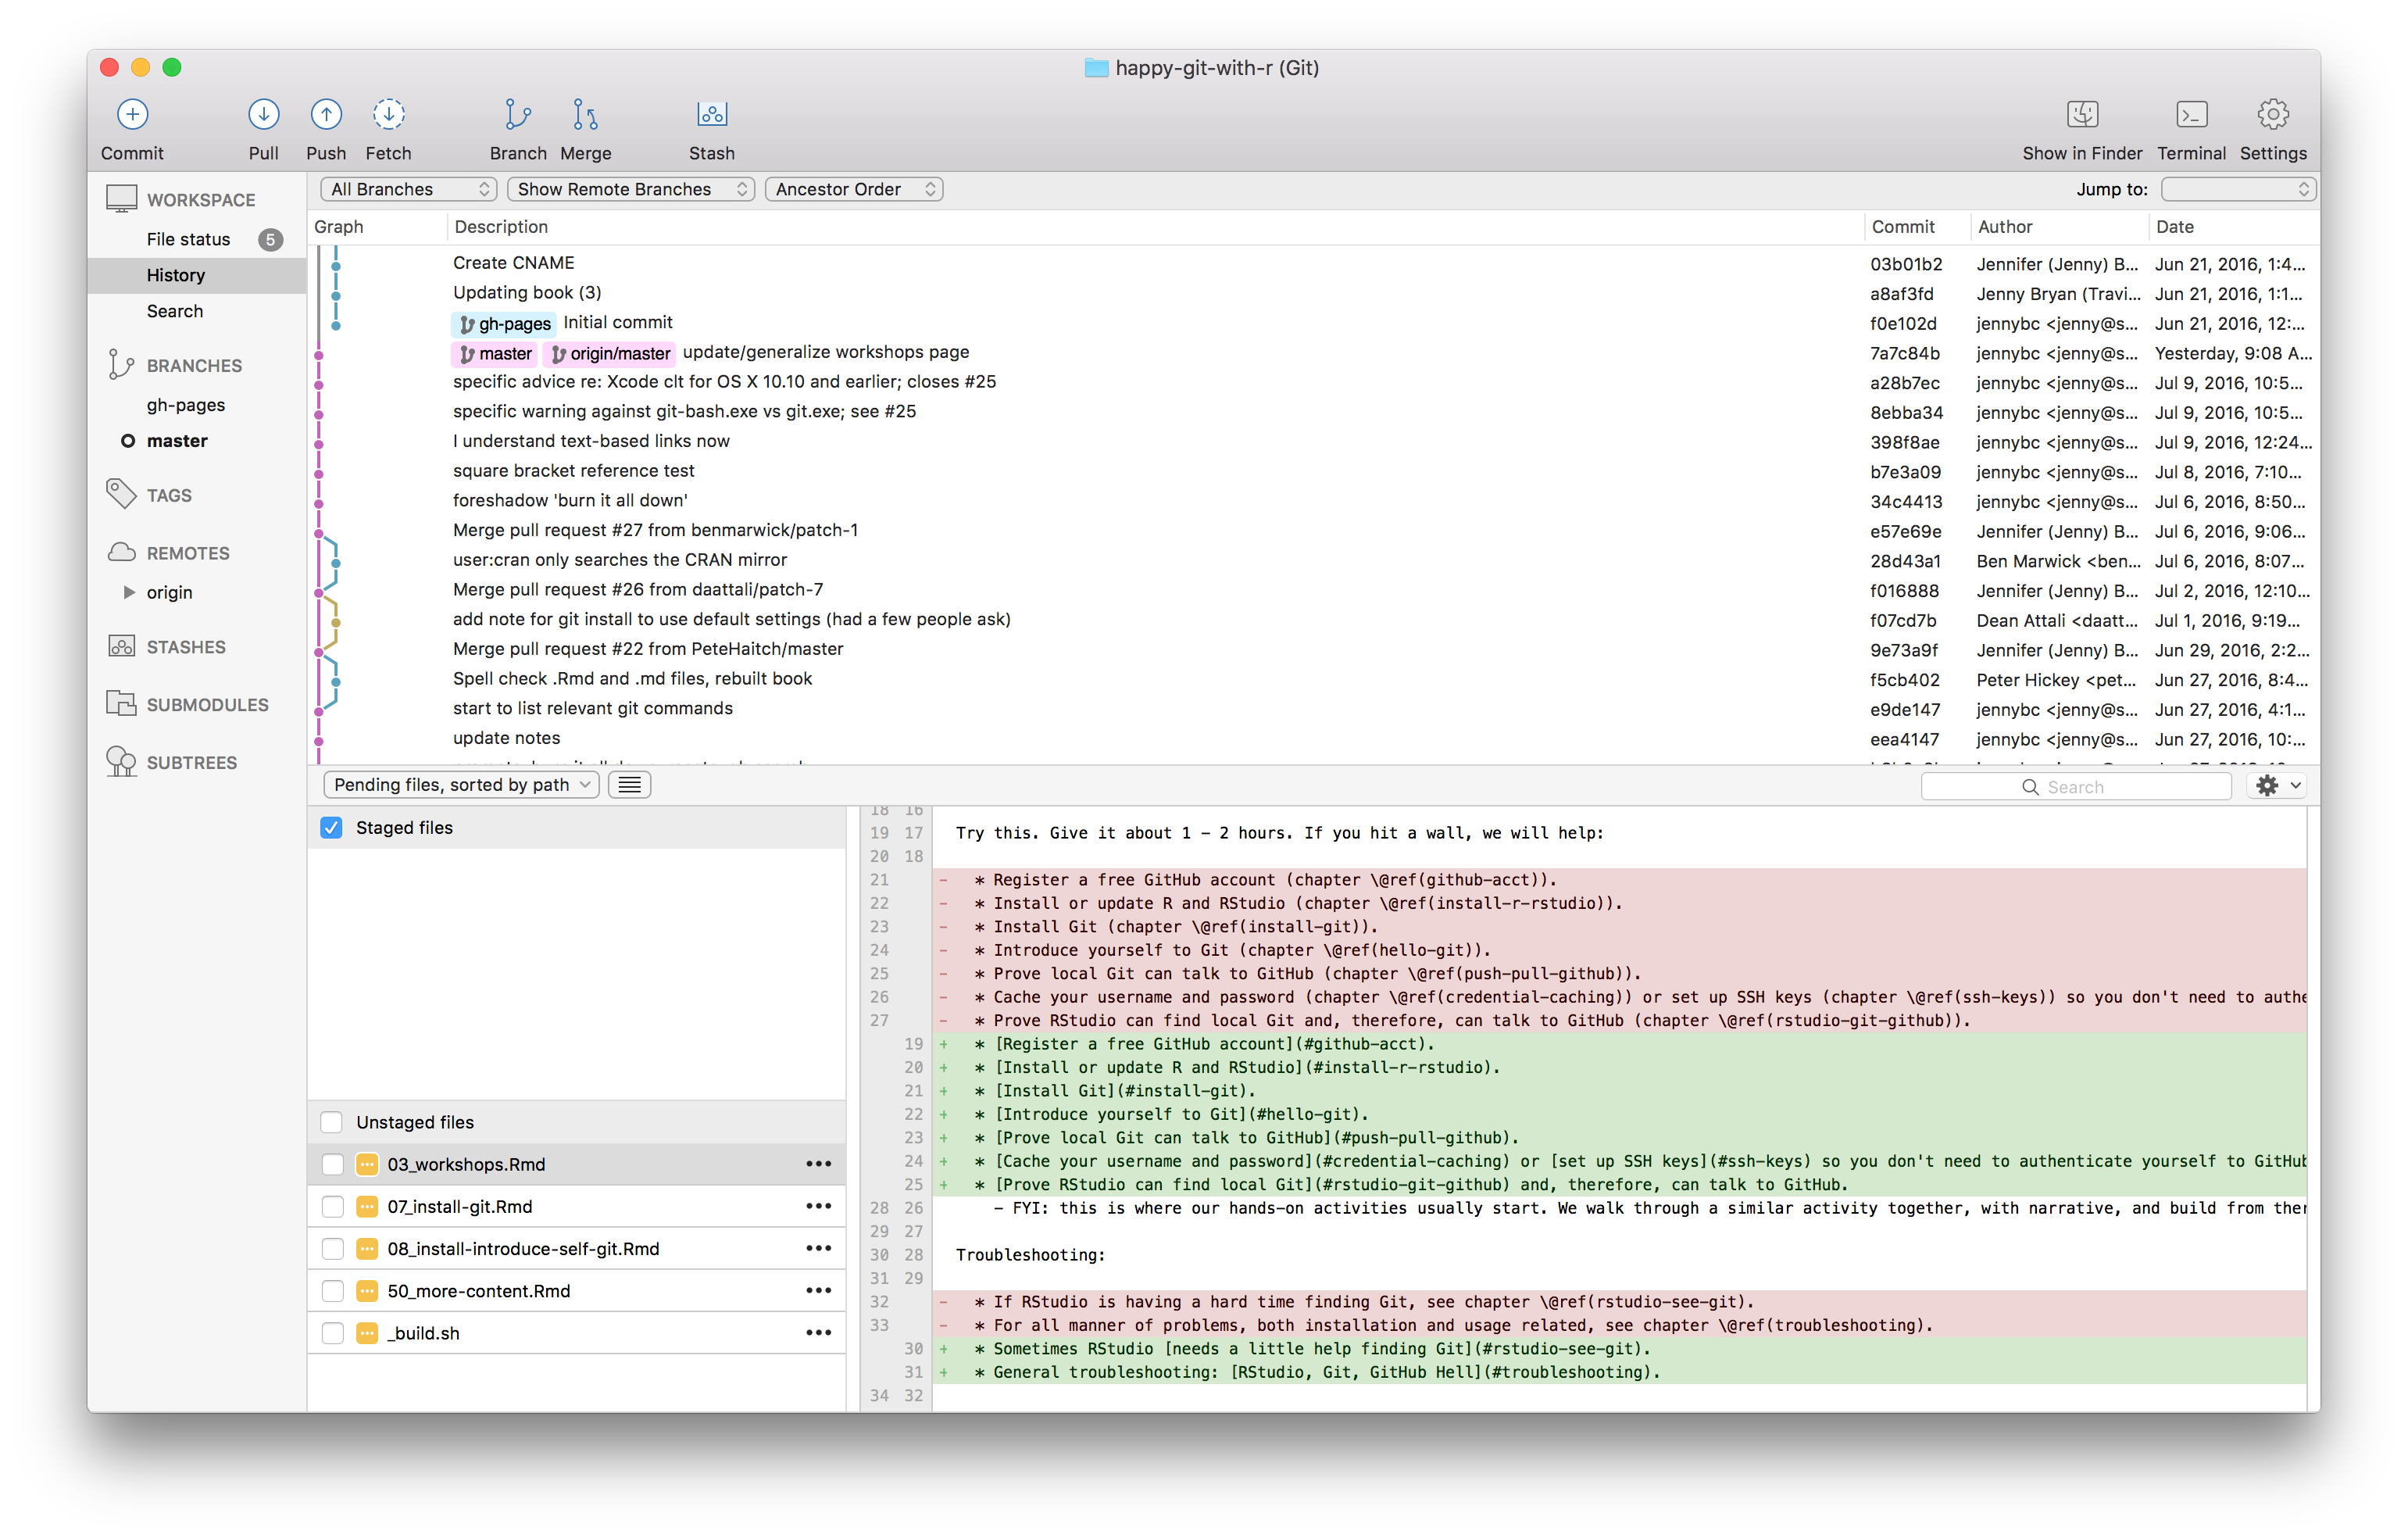
21.8.2 A picture is worth a thousand words
Here’s a screenshot of SourceTree (see below) open to the repository for this site. You get a nice graphical overview of the recent commit history, branches, and diffs, as well as a GUI that facilitates the most common Git operations.
In contrast, here’s a shell session where I’ve used command line Git to access some of the same information.
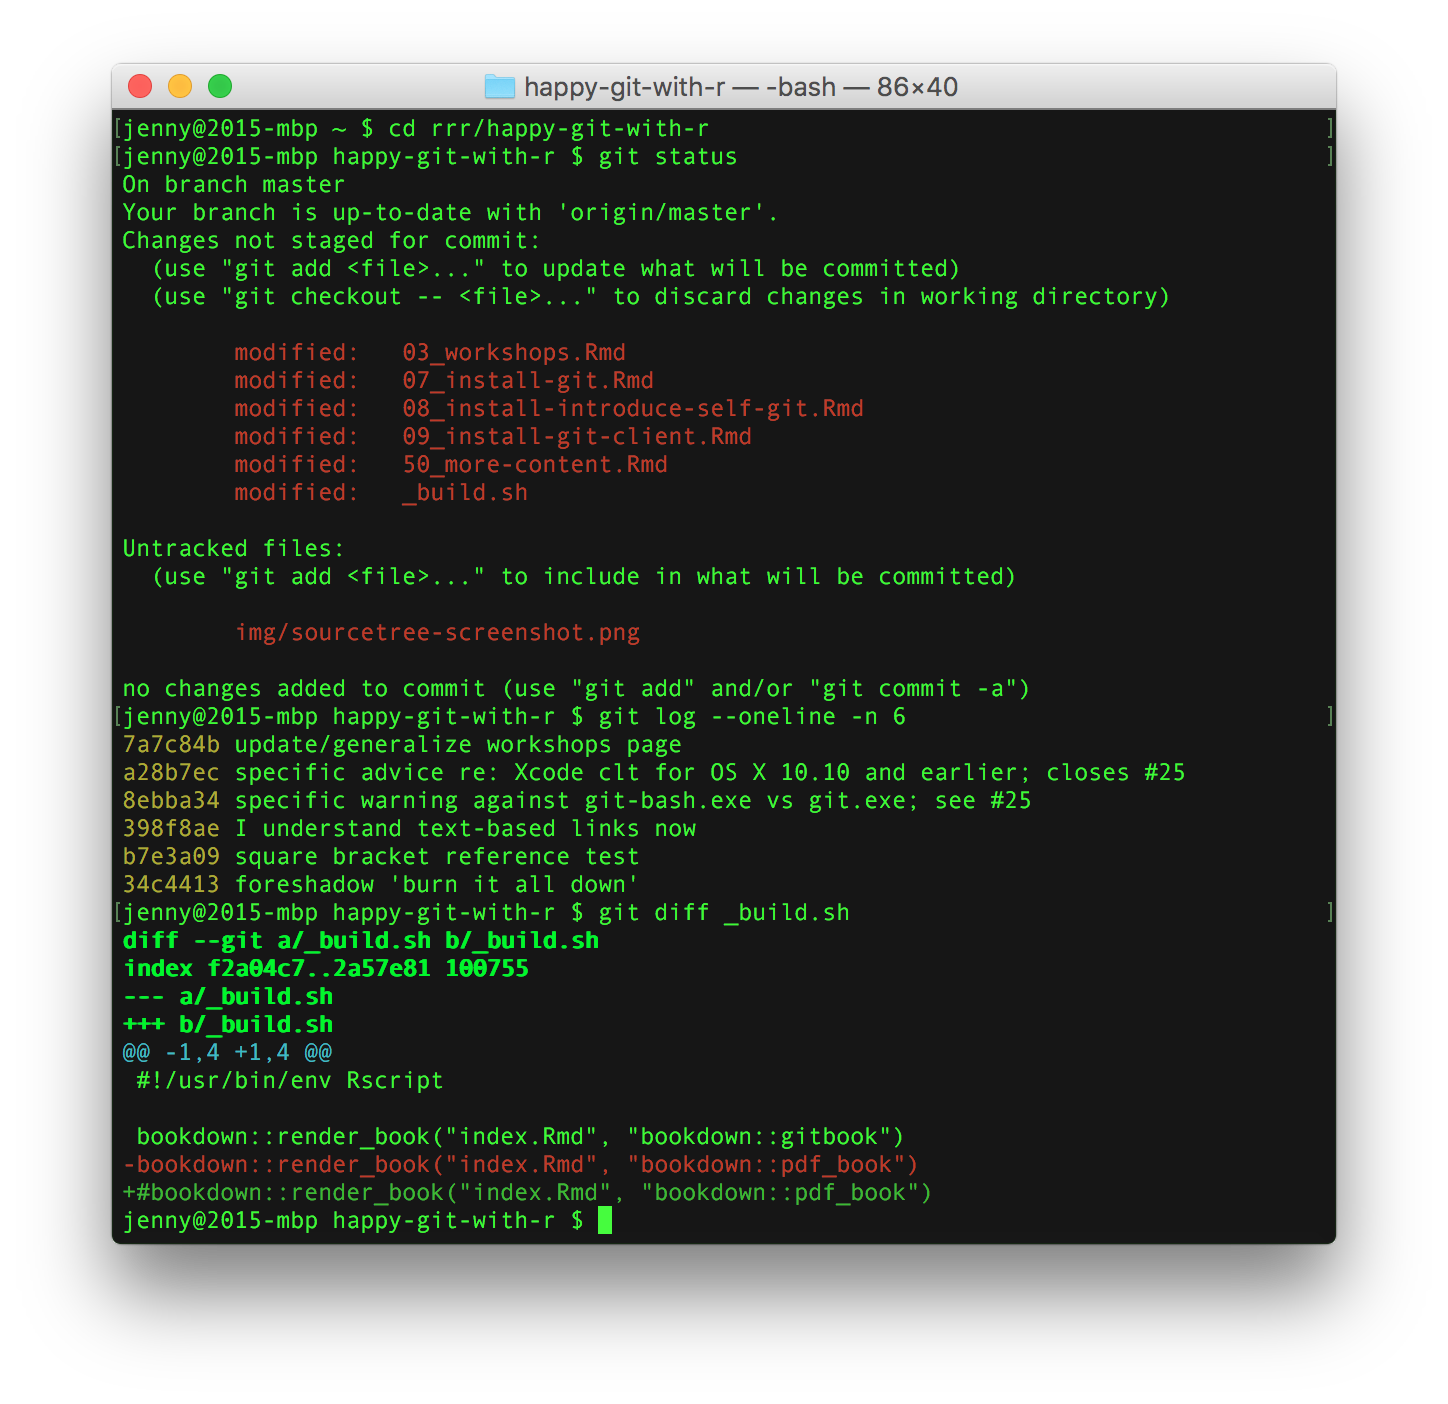
Which do you prefer?
21.8.3 No one is giving out Git Nerd merit badges
Work with Git in whatever way makes you most effective. Feel free to revisit your approach over time or to use different approaches for different tasks. No one can tell whether you use the command line or a GUI when they look at your Git history or your GitHub repo.
If your Git life happens on your own computer, there is no reason to deny yourself a GUI if that’s what you like. If you prefer working in the shell or if you frequently log into a remote server, then it makes sense to prioritize building Git skills at the command line. Do whatever works for you, but don’t do anything for the sake of purity or heroism.
21.8.4 Recommended Git clients
Install a Git client: GitHub offers a free Git(Hub) client, GitHub Desktop, for Windows and macOS. GitHub Desktop is aimed at beginners who want the most useful features of Git front and center. The flipside is that it may not support some of the more advanced workflows exposed by the clients above. At present, this client is what I, Mason, mostly use.
GitKraken is a free, powerful Git(Hub) client that is Jenny Bryan’s current favorite. It’s especially exciting because it works on Windows, macOS, and Linux. This is great news, especially for long-suffering Linux users who have previously had very few options.
SourceTree is another free client that Jenny highly recommends, at least on Windows 1. It was her first and most beloved Git client, but she eventually had to give it up on macOS, due to a long-standing bug re: leaking file handles that they will clearly never fix. Jenny Bryan still uses SourceTree on Windows.
Others that I have heard positive reviews for:
Browse even more Git(Hub) clients.
21.10 📝 Optional next steps
- Create a new markdown file in this repository. Let them know what you learned and what you are still confused about! Experiment with different styles!
- Create your profile README. Let the world know a little bit more about you! What are you interested in learning? What are you working on? What’s your favorite hobby? Learn more about creating your profile README in the document, “Managing Your Profile README”.
- Go to your user dashboard and create a new repository. Experiment with the features within that repository to familiarize yourself with them.
- Let github know what you liked or didn’t like about the content of this course. What would you like to see more of? What would be interesting or helpful to your learning journey?
During installation and registration, you’ll need to create a free Atlassian Bitbucket account and link that to a free Atlassian Bitbucket Cloud account. Also, feel free to uncheck the checkbox about installing Mercurial (another version control system), unless you feel you need it.↩︎